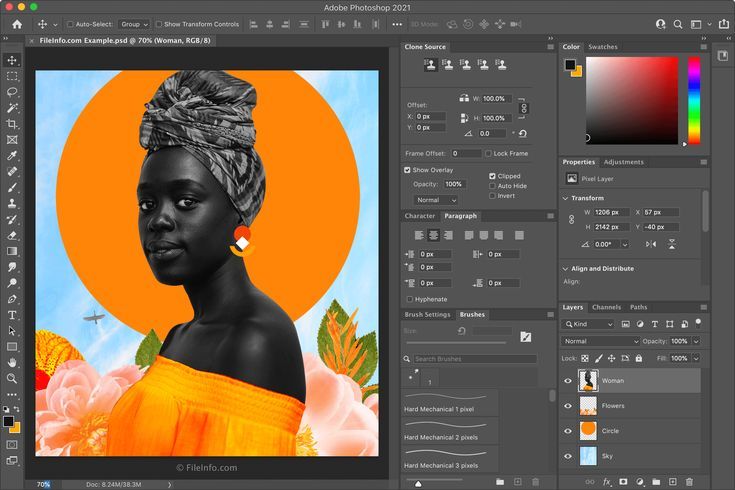

Photoshop's panels can look like an aircraft cockpit the first time you open them. But most of what you'll ever use comes down to about a dozen features, and each one does something you can describe in a single sentence. Here they are, in plain language.
1. Layers
Sheets of clear plastic stacked on top of each other.
Everything in a Photoshop file sits on a layer. The layer at the top of the stack covers what's below it, and anywhere a layer is empty, you see straight through to the next one down. Because each piece lives on its own sheet, you can move, hide, delete or fade any one of them without disturbing the rest.
2. Selections
Drawing a fence around the part you want to change.
A selection tells Photoshop "only this area counts right now." Once something is selected, every brush stroke, filter and colour change stays inside those marching-ants lines and leaves the rest untouched. The Marquee tool selects simple rectangles and ovals, the Lasso selects freehand shapes, and Quick Selection guesses the edges of an object for you when you drag across it.
3. Layer masks
Hiding part of a layer instead of erasing it.
A mask is a black-and-white sheet attached to a layer. White areas of the mask leave the layer visible; black areas hide it; grey makes it partly transparent. You "erase" by painting black onto the mask — and if you go too far, you paint white and it comes right back.
4. Adjustment layers
Colour and brightness changes that float above the image rather than sink into it.
Instead of altering your photo's pixels, an adjustment layer sits above it and changes how everything underneath is displayed. Brightness, contrast, saturation, colour tints — all of it can be dialled back, turned off or deleted weeks later without leaving a mark on the original.
5. Blend modes
Rules for how a layer mixes with the one below it.
Normally a layer simply covers what's underneath. Blend modes change that relationship. Multiply keeps only the dark parts, so it's used for shadows. Screen keeps only the light parts, good for glows and light leaks. Overlay boosts contrast by doing both at once.
6. Smart Objects
A protective wrapper that remembers the original.
Convert a layer to a Smart Object and Photoshop keeps the full-quality original tucked inside. Shrink it to a thumbnail, then scale it back up, and it stays sharp — a normal layer would come back blurry because the discarded detail is gone for good.
7. Retouching tools
Copying good pixels over bad ones.
The Spot Healing Brush removes small blemishes by sampling the area around them and blending the texture in automatically — usually a single click. The Clone Stamp gives you manual control: you hold Alt/Option to pick a source point, then paint an exact copy of it somewhere else. Content-Aware Fill handles larger jobs, like deleting a person from a beach, by inventing plausible background.
8. Filters
Pre-built effects applied in one step.
Filters run a calculation across a whole layer. Most of your use will be the practical ones rather than the decorative ones: Gaussian Blur for softening, Unsharp Mask or Smart Sharpen for crispness, Lens Correction for straightening warped architecture, and Camera Raw Filter, which bundles a whole photo-editing toolkit into one window.
9. Crop and canvas size
Two different meanings of "resize".
Crop trims the picture down to the part you want. Image Size changes how many pixels the image contains, which is what you adjust before printing or uploading. Canvas Size adds or removes space around the image without scaling what's already there — useful for adding a border.
10. Type and shapes
Text and graphics that stay sharp at any size.
Text and shape layers are stored as instructions rather than pixels, so they can be scaled, recoloured and re-edited endlessly with no loss of quality. Double-click a type layer and you can rewrite the words; the layer redraws itself perfectly.
11. The History panel
A list of everything you've done, in order.
Undo steps backwards one action at a time, but History lets you click any earlier point and jump straight back to it. By default it remembers the last 50 steps, and it forgets everything the moment you close the file.
12. Actions
Recording a set of steps so you can replay them.
Press record, perform your edits once, press stop. From then on, one click applies that same sequence to any other image — and Batch runs it across an entire folder while you make coffee.
Quick recap
| Feature | In one line |
|---|---|
| Layers | Stacked transparent sheets that keep elements separate |
| Selections | Limits an edit to one area of the image |
| Layer masks | Hides part of a layer without deleting it |
| Adjustment layers | Reversible colour and brightness changes |
| Blend modes | Controls how a layer mixes with the one below |
| Smart Objects | Keeps the original quality when scaling or filtering |
| Healing & Clone | Covers flaws by copying clean pixels over them |
| Filters | One-step effects like blur, sharpen and lens correction |
| Crop / Image Size | Trims the frame, or changes the pixel dimensions |
| Type & shapes | Editable text and graphics that never pixelate |
| History | Jump back to any earlier point in the session |
| Actions | Record a sequence of steps and replay it on demand |
If you're starting from zero, learn them in this order: layers, then selections, then masks. Those three underpin everything else, and once they click, the rest of Photoshop stops feeling like a cockpit.